
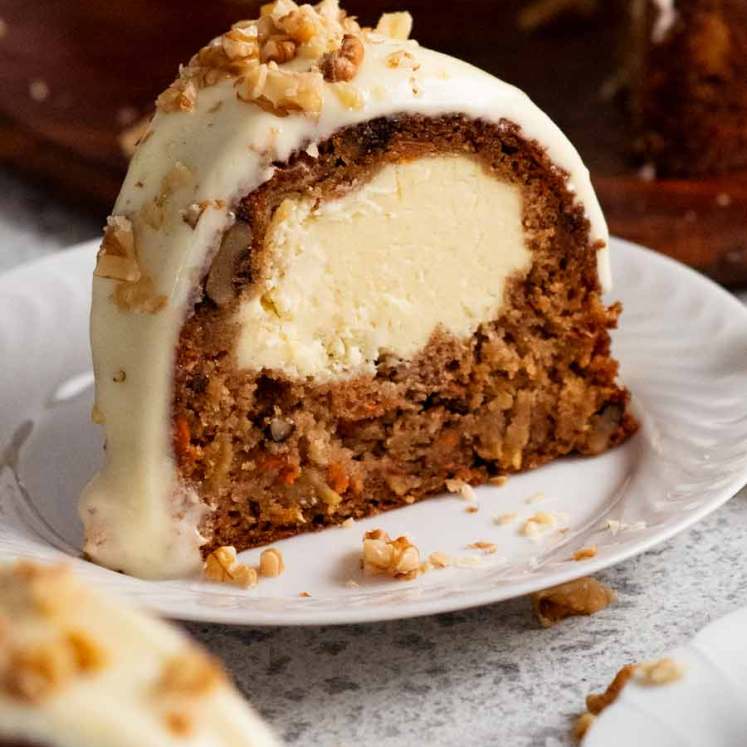
The iconic Basque Cheesecake has landed! With a mousse-like creamy vanilla texture and gorgeous golden “burnt” surface, the flavours remind me of créme caramel. You’ll be amazed how easy this recipe is (she says, 25 versions later 😅).
Basque cheesecake
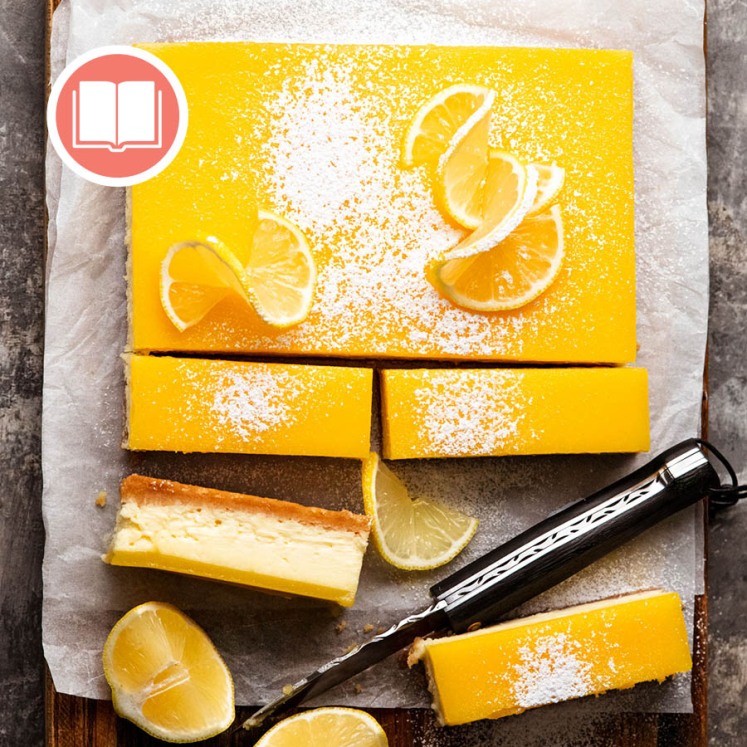
The next time you want to make a cake that really stands out, make this Basque Cheesecake. Sure, people ooh and aah over the appearance. That golden surface, after all, screams look at me!
And you’ll get street cred for making something that’s on-trend. Though, I’m a few years late. Everybody knows I’m not cool enough to keep up with food trends. 😂
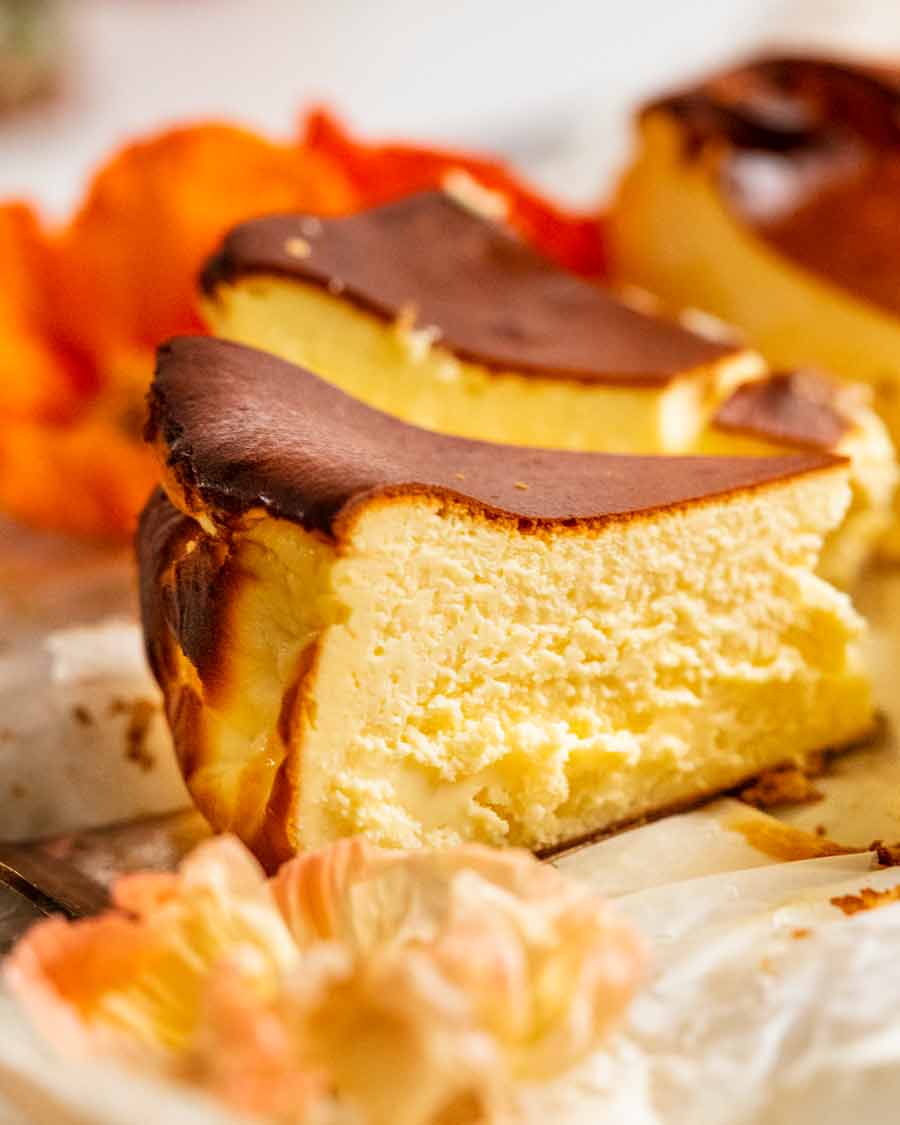
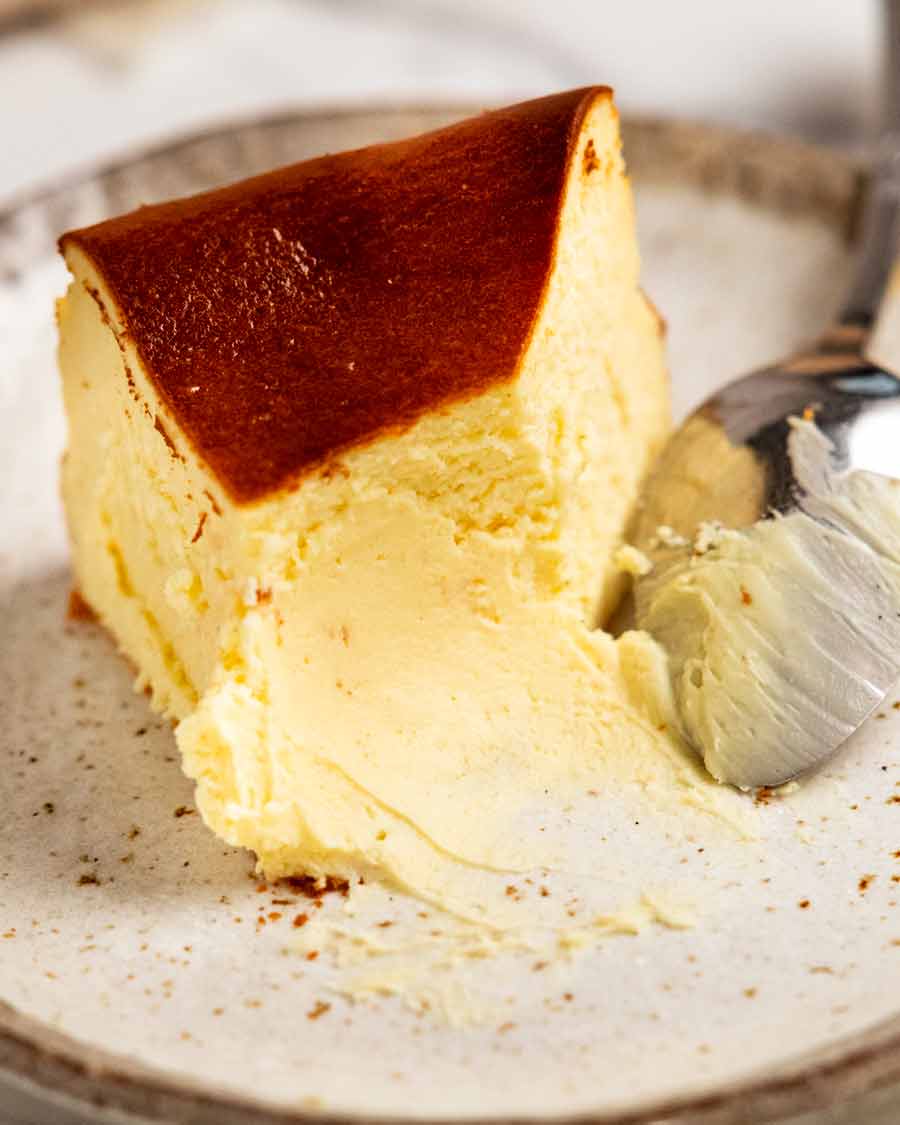
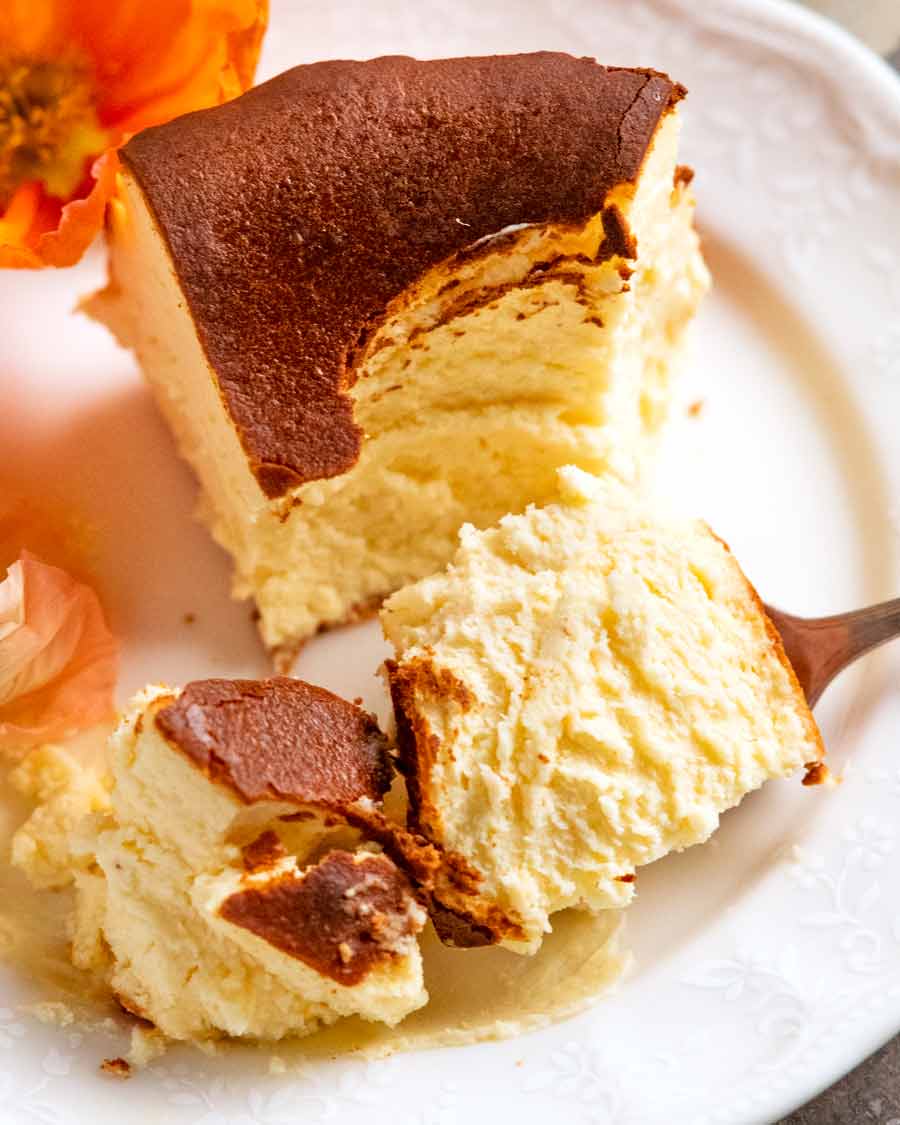
But it’s the eating part that really blows everyone away. Beautifully light and airy inside, almost like mousse. Just sweet enough, tastes luxurious yet not at all rich.
And of course, there’s the “burnt” surface, with the distinct caramel flavour. Combined with the vanilla cheesecake underneath, the flavour reminds me of créme caramel. It’s to-die for!
What is a Basque Cheesecake?
Basque cheesecake is an iconic baked cheesecake hailing from San Sebastián in Spain’s Basque Country (hence the name!). It’s become increasingly popular over the past few years, thanks to food media and celebrity chefs singing its praises.
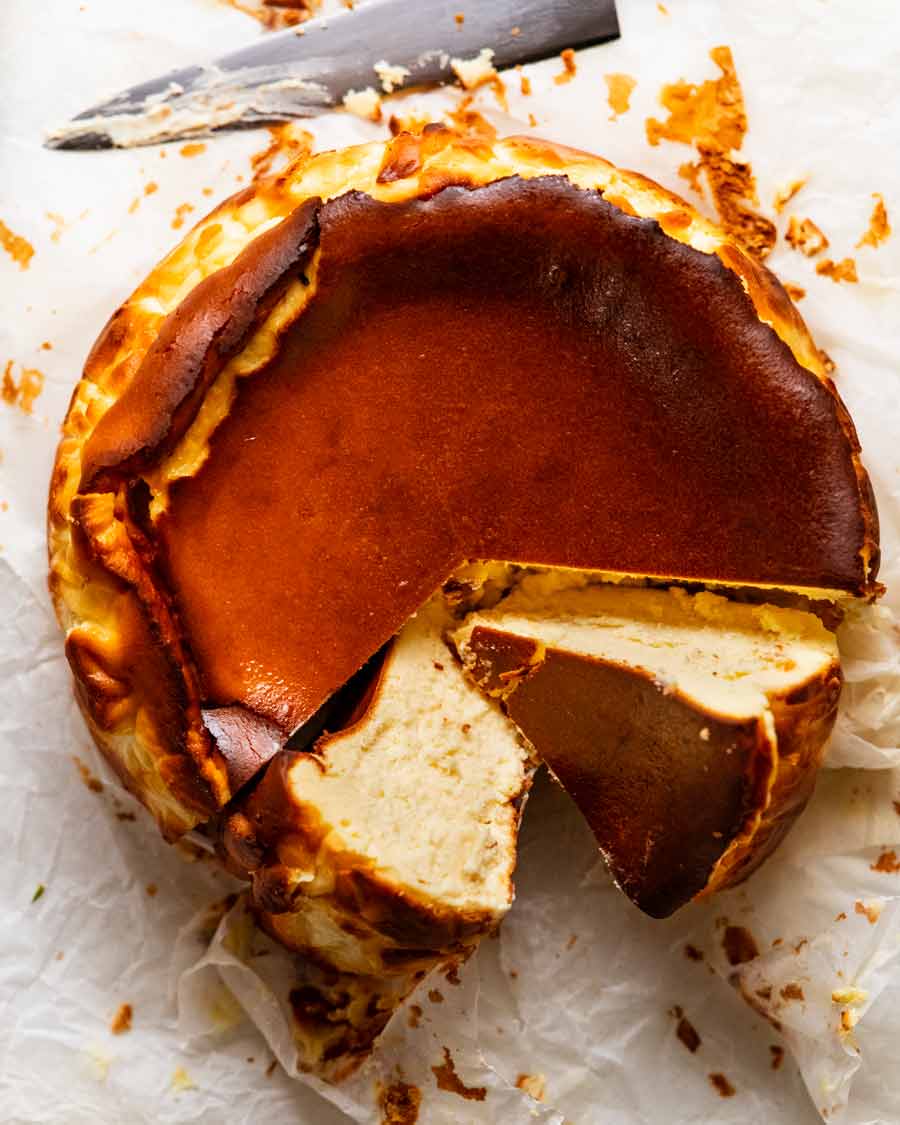
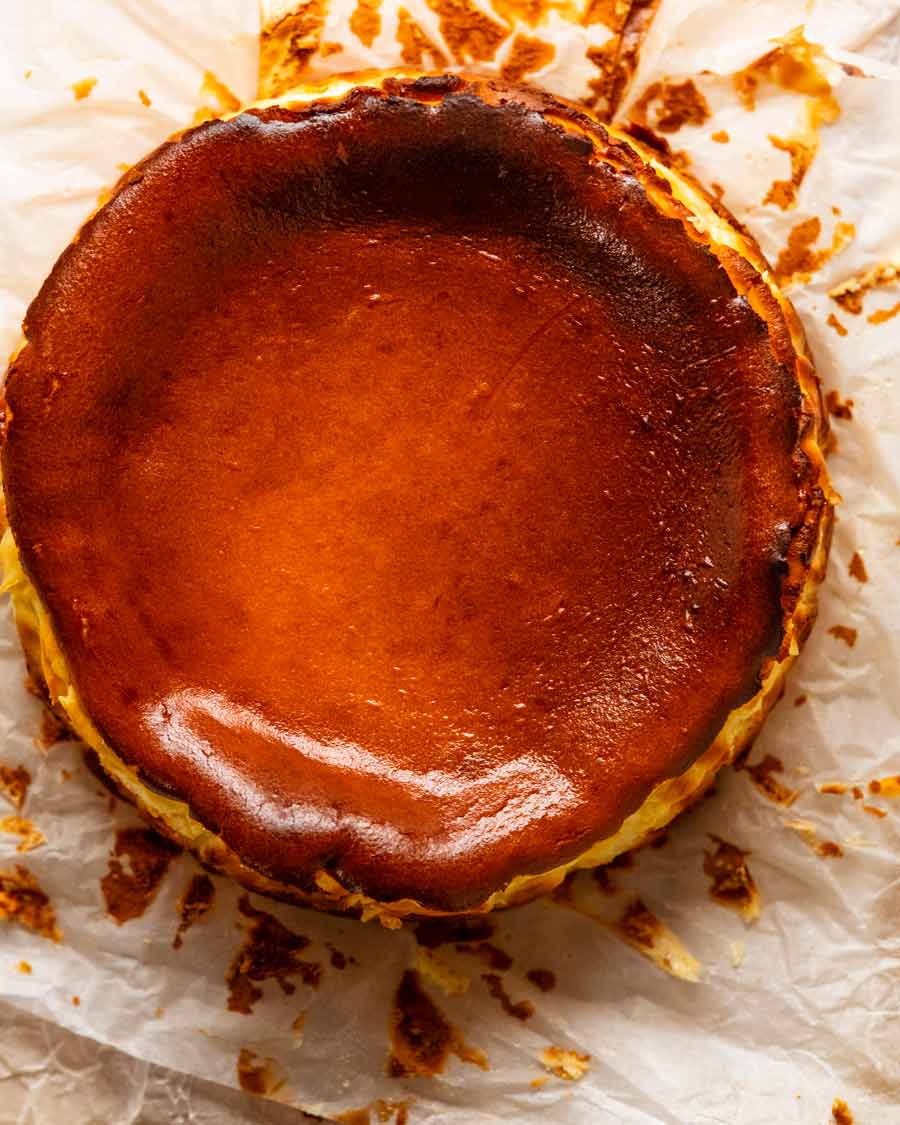
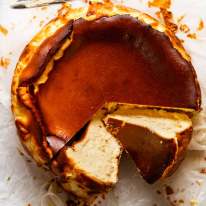
It’s a crustless cheesecake (I promise you won’t miss the biscuit crust!) with a signature “burnt” surface. To me, Basque Cheesecake tastes like créme caramel, with the caramel flavour of the golden surface and patchy sides, and vanilla cheesecake underneath.
The texture of Basque Cheesecake is unique, much lighter than most cheesecakes. It sits between the extremely fluffy soufflé-like Japanese Cotton Cheesecake and my classic baked cheesecake, while the much denser New York Cheesecake is on the far end of the spectrum.
Shop-bought Basque Cheesecakes are pricey (think, $60+) and all too often fall short of expectations. Too dense, too sweet or a thick band of dry overcooked cheesecake on the base and sides are common gripes I’ve had.
So if you want a really great one, make a homemade one! This one, of course! 😇
Ingredients
There’s very few ingredients in Basque Cheesecake. Making a great one comes down to technique!

Cream cheese – Philadelphia is my go-to, but we made this with a variety of brands (including most economical) and it still worked great. Tub spreadable cream cheese also works, albeit the inside is marginally more creamy (some would find it even more appealing!) But DO NOT USE LOW FAT! Won’t set properly.
Measuring the eggs – This recipe calls for 220g / 200 ml / 3/4 cup + 1 tablespoon of whisked eggs which is 4 to 5 large eggs. Yes, I really need you to measure the eggs for this recipe, because those selfish chickens, they just won’t lay the same size eggs every time! And using the right amount really matters for the best outcome with this recipe. Too little, and the cheesecake won’t set. Too much, and it gets denser.
I rarely ask this in cakes – only when it matters. So please measure the eggs! Crack, whisk, measure. 🙂
Whipping cream – Make sure you use cream that can be whipped. Not all creams are, some are made for just pouring or dolloping. Read the label to check. And – NO LOW FAT! 🙂
The recipe calls for you to take it out of the fridge 15 minutes prior to use. This is to take the fridge chill out of it slightly, so it incorporates better with the other ingredients.
Flour – This stabilises the filling so it stays aerated and fluffy once baked. We use the minimum amount possible – too much flour makes the filling drier.
Vanilla – Use vanilla extract or bean paste. Imitation vanilla flavour is not as good because it’s….well, it’s imitation. 🙂
Sugar – Caster / superfine sugar is best here as the grains are finer so it dissolves more easily. However, regular sugar can be used too.
How to make Basque Cheesecake
Basic recipes will have you just dump everything into a bowl and mix. Easier. But the inside is not as light and airy, as Basque Cheesecake should be!
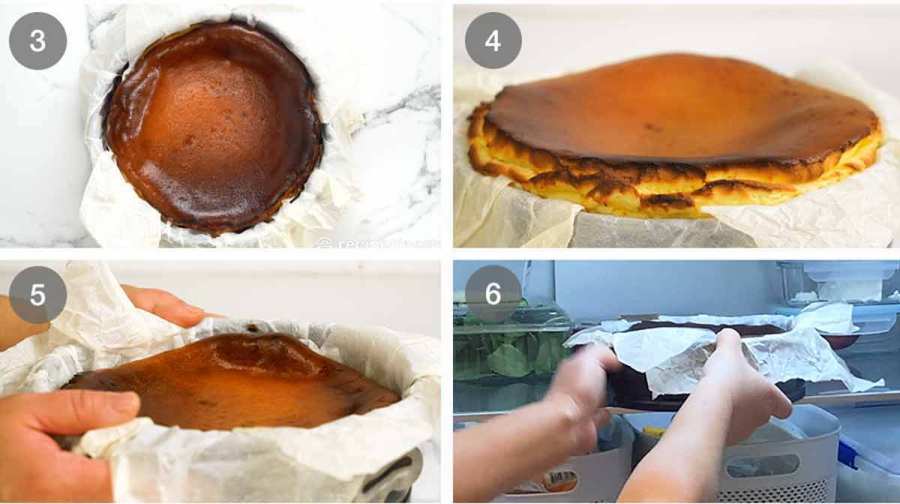
Lining the pan

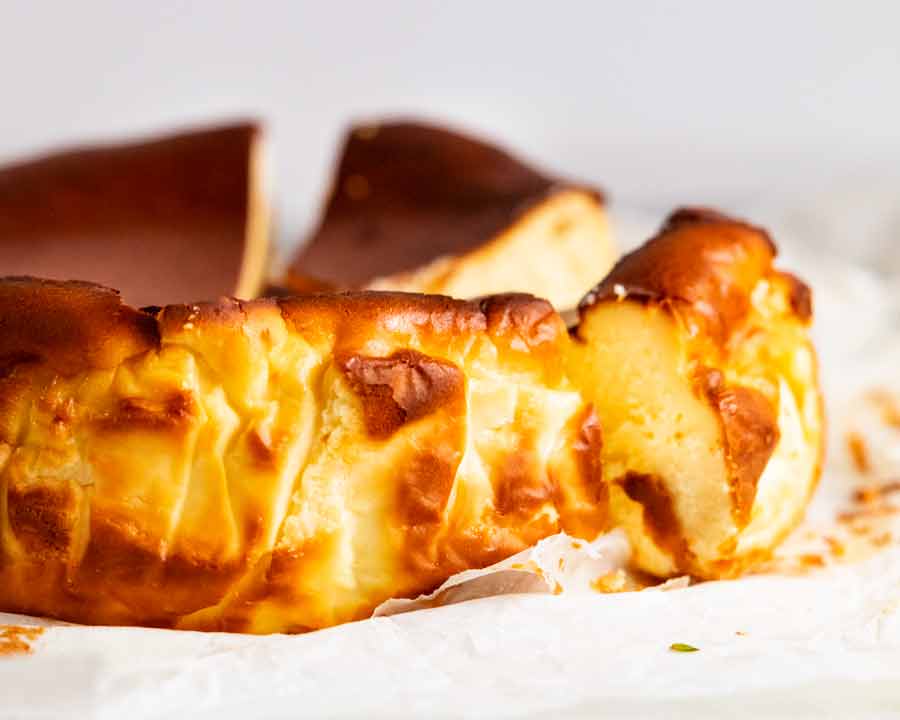
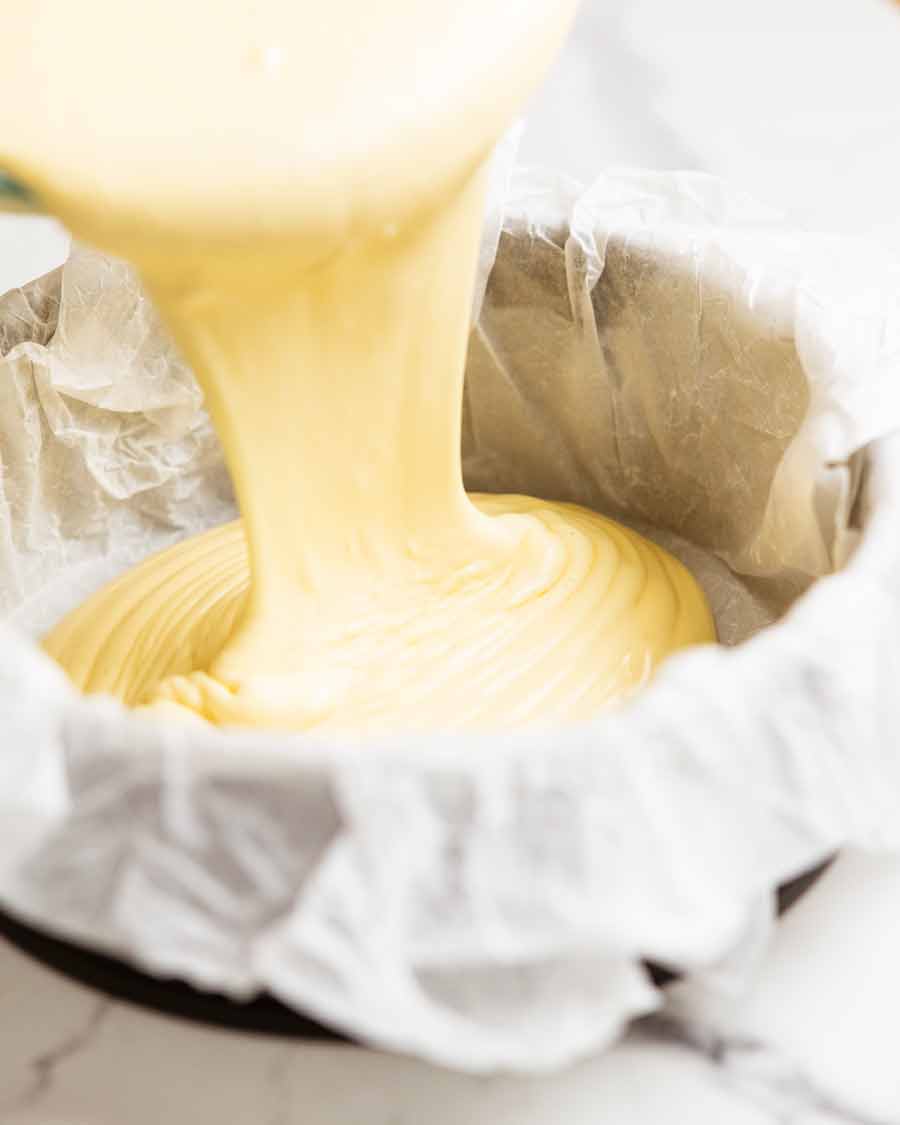
Scrunch up baking / parchment paper in your hands. This makes it easier to press and stay in the pan as well as creating the signature rustic sides on the cheesecake.
Fit the paper into the cake pan. There’s no need to grease the pan to make the paper stick, just fit it in – the batter will weight it down. Press the paper into the corners of the pan and fold the sides down over the rim.
Don’t be tempted to try to make the cheesecake sides smooth by lining the cake pan the traditional way with flat strips of paper! The crumpled paper actually keeps the sides of the cheesecake from overcooking as it’s not fully pressed against the pan walls. Flat paper = thicker band of drier cheesecake. Tried and tested!
Basque cheesecake batter
No tricky steps here! The method is designed specifically to achieve an incredible delicate, “mousse-like” texture that you get with the very best traditional Basque Cheesecakes.

Use a handheld electric beater or stand mixer with the paddle attachment. I personally prefer hand-held beater because the beating times are pretty short, and you can move it around which means less scraping down sides.
Beat the cream cheese until smooth. Then beat in the sugar, just until incorporated.
Cream and flour – In a separate bowl, using a handheld whisk, whisk the flour with about 1/4 of the cream until it’s lump free. It will become paste-like. ⚠️Don’t add too much cream at the beginning otherwise it’s impossible to whisk in the flour without lumps!
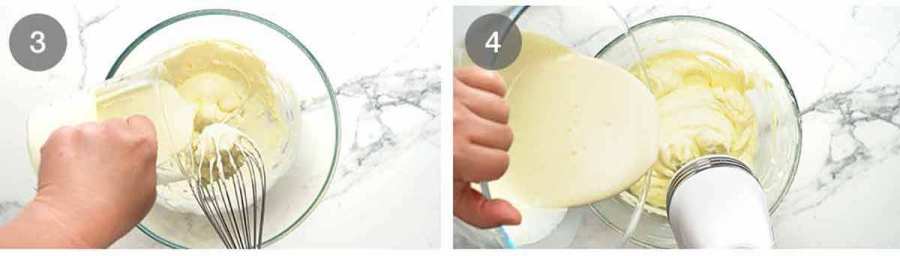
Then whisk in the remaining cream and vanilla. Just whisk until mixed in. We’re not making whipped cream here!
Pour the cream mixture into the cream cheese while beating on low speed.
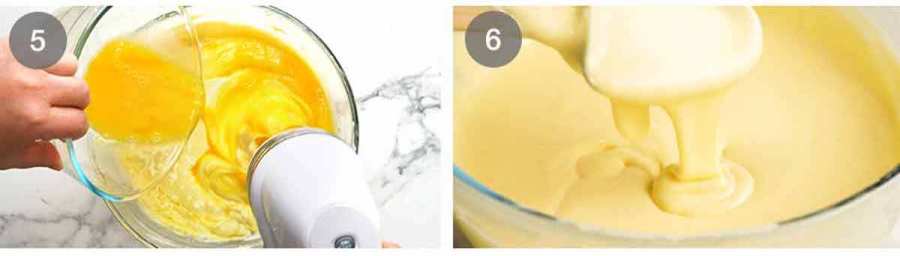
Pour slowly whisked eggs into the mixture while beating on low speed. ⚠️Stop beating as soon as the eggs are incorporated to minimise bubbles in the batter. This leads to unsightly blemishes on the cake surface! (Just visual, so not the end of the world).
Batter thickness – This is the thickness of the batter. Pourable but thick and silky!
Baking and cooling
Bake until the surface is deeply caramelised but not burnt. The baking times will vary from oven to oven, but the inside will be the same light and airy whether it takes 45 minutes (my oven) or 65 minutes (JB’s oven). We checked this multiple times because we couldn’t believe our eyes!
Bubble popping – For a lovely blemish free surface, bang the pan on the counter to make bubbles rise to the surface. Then pop the bubbles with a small sharp knife. Repeat 2 or 3 times. This is for visuals only, it’s not a big deal!
Bake for 45 minutes in a hot 220°C / 425°F (200°C fan-forced), or until the surface is a deep golden brown. Keep a close eye on it for the last 15 minutes. There’s a fine line between “deeply caramelised” and “burnt”. Don’t fall on the wrong side of the line!
⚠️ Bake time variations – With the many versions we tested, we found that the bake time can vary wildly between ovens. With most ovens, it takes 45 minutes. But in other ovens, it was taking as long as 65 minutes for the surface to become golden – and that’s ok! The inside will still be creamy. This was an incredible observation from the many versions we made. This cheesecake batter is extremely forgiving!
This is the colour we’re aiming for. Very deep golden brown but not actually burnt on the edges. And a little paler in the middle. The centre should be jiggly like soft jelly! If it’s not wobbly, it’s overcooked = dry cheesecake = 😭 The jiggly centre will firm up once refrigerated.
Rise & fall – As it bakes, the cheesecake rises dramatically like a soufflé. It even rises above the rim of a 6cm / 2.5″ cake pan! But don’t get too excited because as it cools, it collapses….
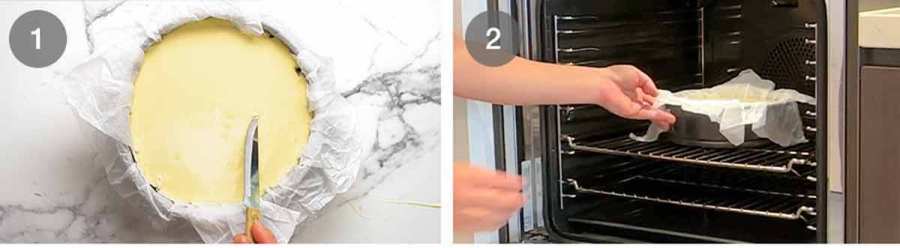
Collapsed – And here it is once cool. The crater is totally normal. 🙂
Cool – Let the cheesecake cool on the counter for a couple of hours. Then refrigerate uncovered for at least 8 hours, preferably overnight.
I refrigerate uncovered because even the smallest amount of residual heat left in the centre of the cheesecake will cause condensation which will drip and blemish the beautiful bronzed surface.
Once the cheesecake has been refrigerated, it’s time to EAT!!
Matters of serving
I like to serve Basque Cheesecake on the paper because it looks rustic, the classic Basque Cheesecake look.
But you can absolutely do a neater presentation and transfer to a cake platter without the paper. Once refrigerated overnight, so it’s easy to handle.
It cuts into neat slices, so serve it like cake. For neat slices, wipe the knife clean between each cut. You can dip into a jug of warm water, if you like, but it will smear the cut face. I personally prefer the “sponge-like” look so I just wipe the knife clean.
As for what to serve Basque Cheesecake with? Absolutely nothing. No cream, no berries, no coulis, no sauce. It doesn’t need it. Enjoy every bite plain, and if you don’t sigh with satisfaction, you must be made of stone. – Nagi x
RECIPE CREDITS
Iconic recipes like today’s Basque Cheese are often the result of a collective team effort, and I just want to take a moment to thank those involved. Because it was a difficult one!!
Many thanks to Jennifer Pogmore, French pastry Chef extraordinaire, who has found herself in the unlikely position as my baking mentor. Located in France, we work online together, experimenting and developing recipes. She is exceptionally talented, classically trained at Le Cordon Bleu where she subsequently returned as a teacher after years of working in Parisian pastry boutiques.
I feel very fortunate that our paths crossed! Much of the groundwork on what makes a perfect Basque Cake is attributed to Jennifer, drawing on her experience from her time in the Basque Country.
The recipe was then picked up by JB and I who then took it through its paces here in Sydney. Collectively, we made at least 25 versions of Basque Cheesecake, testing various iterations.
Why am I so extreme with the testing? Because this is such an iconic, traditional Spanish recipe, we want to do it well. This Basque Cheesecake recipe really does work as promised, and it is truly excellent, because we would not settle for anything less! I hope you love it as much as we do. ~Nagi, JB and Jennifer


Watch how to make it
Hungry for more? Subscribe to my newsletter and follow along on Facebook, Pinterest and Instagram for all of the latest updates.
Basque Cheesecake
Ingredients
- 750 g / 1.5 lb cream cheese blocks , room temperature (I use Philadelphia, Note 1)
- 1 cup caster / superfine sugar (regular white sugar ok too)
- 1 1/4 cups whipping cream , take out of fridge 15 minutes prior (Note 2)
- 1/4 cup flour , plain/all-purpose
- 1 tsp vanilla bean extract or paste
- 3/4 cups + 1 tbsp lightly whisked eggs , at room temperature, ~4-5 large eggs (yes, I need you to measure! Note 3)
Instructions
- See below for full length written recipe. Shorthand recipe is for experienced bakers.

Shorthand recipe
- Prep – Preheat oven to 220°C / 425°F (200°C fan) with the shelf in the middle. Press scrunched paper into 20cm/8" springform pan.
- Batter – Beat cream cheese 2 minutes on medium. Beat in sugar on low speed for 10 seconds. In separate bowl, hand whisk 1/4 cup cream with the flour (becomes like paste). Whisk in remaining cream and vanilla. While beating on low, slowly pour cream into cream cheese, then eggs (don't overbeat).
- Bake – Pour into pan, bang pan on counter, pop bubbles with knife. Bake 45 min (up to 65 min possible, Note 8) until top deep golden. Cool 2 hrs on counter then 8 hrs+ in fridge uncovered. Ready for serving!
Full instructions recipe
- Preheat oven to 220°C / 425°F (200°C fan) with the shelf in the middle of the oven.
- Pan prep (Note 4) – Press 2 x 40cm/16" sheets of scrunched up baking/parchment paper arranged in an "X" into a 20cm/8" springform pan (6cm / 2.5" tall), and fold down over the rim to hold in place. You'll need to scrunch/pleat to fit which creates the signature rustic sides! The batter will weigh it down so don't worry if it doesn't stay in.
- Beat the cream cheese in a large bowl on medium speed for 2 minutes, scraping down the sides as needed, until smooth and lump-free. Add sugar and beat on low speed for 10 seconds.
- Flour & cream (Note 6) – Put about 1/4 of the cream and all the flour in a medium bowl. Hand whisk until lump free (it will be paste-like), then slowly pour in the remaining cream while whisking. Once flour is incorporated, whisk in vanilla. (PS not making whipped cream here! Should be pourable)
- Slowly pour the cream into the cream cheese bowl with the beater going on low. Beat just until combined. Then slowly pour the eggs in while the beater is still on low speed. As soon as the eggs are incorporated, stop beating to minimise getting bubbles in the batter (Note 7).
- Remove air bubbles – Pour into the prepared pan. Bang the pan on the counter then pop bubbles that rise to the surface with a small sharp knife. I do repeat 3 to 5 times. (Note 7)
- Bake 45 minutes or until the surface is a deep golden brown. It can take up to 65 minutes and that's fine! (Seriously, read Note 8) Keep a close eye on it for the last 15 minutes, you want it deeply golden but not burnt. The centre will still be wobbly and the cake will rise like a soufflé.
- Chill overnight – Cool in the cake pan for at least 2 hours on the counter (it will sink, that's normal). Then refrigerate for a minimum of 8 hours, uncovered.
- Serving – Release the sides of the springform pan. Hold excess paper overhang to lift off base onto a cutting board or plate. Fold down sides – I love serving it on the paper, it's part of the visuals! Bring to room temp for 30 minutes if time permits, though also great served chilled. Cut like cake! Eat as is – doesn't need cream, berries etc.
Recipe Notes:
Nutrition Information:
Life of Dozer
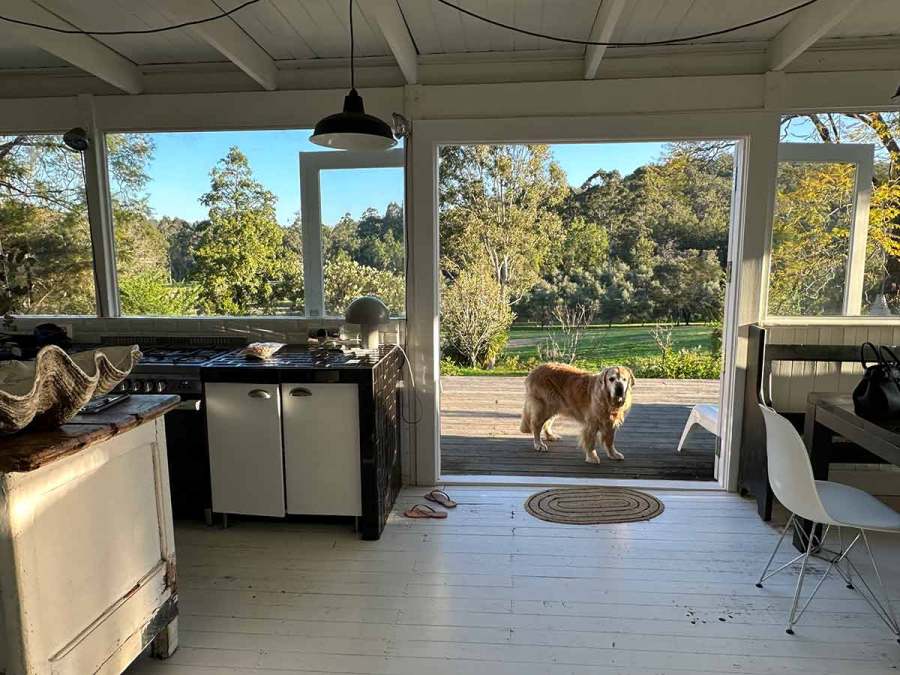
Promised look at the kitchen of the Air BNB I stayed at on the Colo River in a rural area just 90 minutes north of Sydney! Gorgeous. This is the sort of kitchen that speaks to me! Character – but with a killer stove and oven and a big sink. Yes!
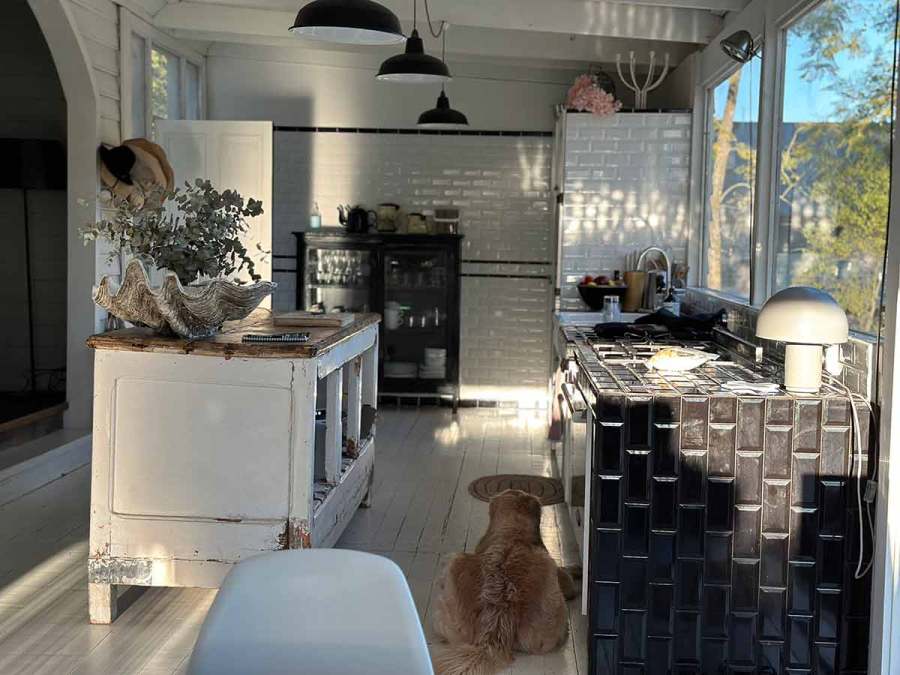

Not a bad view while doing the dishes. 🙂
Checked at 45min, burnt around edges and past golden brown stage.
In hindsight, wish I’d setup additional timers at 35min and 40min (as opposed to just 50min, 55min and 60min).
Take two. Followed recipe exactly but started checking from 30min.
Mine is an AEG oven. Based on first attempt (disaster), realised it runs hotter. At 30min it was almost done. Removed at 35min.
Was looking for a recipe for this cheesecake. Someone suggested to me that a well known chef Karen M had a very good recipe. Then I thought what r u thinking just go to recipe tin eats. Absolutely all of your recipes I’ve made and there are quite a few have never dissapointed. So needless to say it will be your recipe I shall be making Nagi. Cuddles to Dozer please
This was simply divine!! You are a true goddess Nagi.
Question about the parchment paper. Do you wet the paper before scrunching it in the springform pan? Of course you’d let it dry completely before pouting your batter inn😊
No water! Just crumple it
This cheesecake was indistinguishable from the one served by the highest rated tapas bar in Hiroshima. Maybe they use your recipe, too.
Have made this before and it was fantastic. The taste and texture are perfect. Going to make it again this weekend. It is a wonderful cheesecake. Thank you for excellent recipe.
Made this cheesecake for my friends and then my family, they loooved it however i cant seem to get the crust correct.. the sides are most often more blackened burnt than usual and the top usually has cracks, is there a reason? What am i doing wrong?
I went to a friend for dinner last night. Dessert came out and voila I immediately recognised your Basque Cheesecake. You were the topic of conversation around the table with us comparing notes of which of your recipes we have made and how we absolutely love what you do and how you turn us mediocre “cooks” into much more with your amazing recipes. Thanks a bunch Nagi
I made the Basque cheesecake and it was absolutely delicious! My guests suggested this be my go to for any dinner parties or neighborhood pot lucks!
Hi Nagi,
Super excited to try this recipe! I’m keen to make individual portions of this in my muffin tin, making it a bit easier to share at a picnic.
Any idea of oven timings to accommodate for this? Thanks!
Quantities in ml or grams would be very handy, if as you say the quantities are very important.
Your Note 3 is contradictory. “220g eggs = 200 ml” implies egg is more heavy/dense than water, but you say “Eggs are slightly lighter than water”
Surprisingly easy recipe.
Used the Woolworths brand cream cheese which comes in 225g packs, so needed to buy 4 packs to make the 750gm amount. Tasted beautiful despite not being the Philly brand.
Served with whipped cream and strawberries. Was a hit. No one missed the crust of the cheesecake.
Even though I accidentally cooked it at 220C in my fan forced oven for the first 30 mins it still turned out beautifully.
Well you’ve done it yet again Nagi – produced an outstanding recipe that works perfectly! My Basque Cheesecakes look just like yours and is to DIE FOR yummy! I made two, one for my husband and father to devour and another to take to a friend’s house as dessert for a Spanish dinner they’re making for us. I had already decided to make a Basque Cheesecake and was researching recipes when I wondered if you had a recipe for it (almost positive you wouldn’t though). Imagine my delight when found this recipe – research ended right there because I knew your recipe would work out perfectly, and it did. I couldn’t believe how lucky I was that you’d already written this recipe. My friends are going to LOVE dessert tomorrow night all thank to you. You’re a rockstar Nagi. I’m still trying to cook the gazillion recipes I have dog-eared in your book, there are too many gorgeous recipes that I probably won’t live long enough to cook them all! Give Dozer some love from me, I adore him as much as your food! xx
Absolutely sensational. It came out the oven exactly as it should have. I was so excited when I saw it rise and fall!!!! My family guzzled every last morsel, even my grandsons who don’t usually like cheesecake asked for “more please”. Nagi your recipes are winners!!!! Thank you.
Came out perfect
Recipe turned out really well & very yummy will definitely make again
Thank you
I’ve just had a sample of this cake. I normally detest cheesecakes- but this is delicious!
My wife is wheat intolerant- have you made this cake with glutton free flour?
Hey Geoffrey, I haven’t seen on Nagi’s website in particular but there are many online recipes that don’t include flour at all, making it gluten free 🙂 you just need to do a quick Google search!
This is a follow up question. Per using an 8” springform pan, about how high is the side of the cake when done? I’m in the U.S. and want to convert the recipe for a 9” pan. Thanks!
This recipe uses an 8” springform pan. Can you tell me how high the sides of the pan should be? Thanks!
Wow! I made it and it was delicious!
Thank you so much!